- Home
- Products
- Sound Tech and PA
- Sound Tech Course
- Free Tech Resources
- Free Sound Tech Lessons
- Playing By Ear
- Play By Ear Course
- Ear Training & Music Theory Resources
- Worship Leading
- Worship Leading Course
- Free Worship Leader Training
- Free Worship Leader Resources
- Band Skills Course
- Free Worship Team Training
- Free Worship Team Resources
- Subscription
- Blog
- Contact
- About
- Search
Creating fractal images for visual worship

Here is an explanation for creating “fractal images” like the Christmas ones we published yesterday.
Richard created the Christmas fractals using a freeware fractal generating program called Apophysis. To read more about fractals, visit here.
Apophysis generates random images using fractal mathematics. But the maths is completely hidden behind a friendly interface, so don’t be put off, or worry about having to wrap your mind round some complex maths.
Briefly, Apophysis generates the initial fractal image initially. I then load this into an image editor to apply various processes and enhancements, and add text if required.
Getting Started
What you will need:
1. Apophysis (v2.09) software. Sadly, it’s Windows only.
2. An image editing program (Photoshop, Paintshop Pro, GIMP or an online one like www.pixlr.com or Photoshop Online)
Using Apophysis
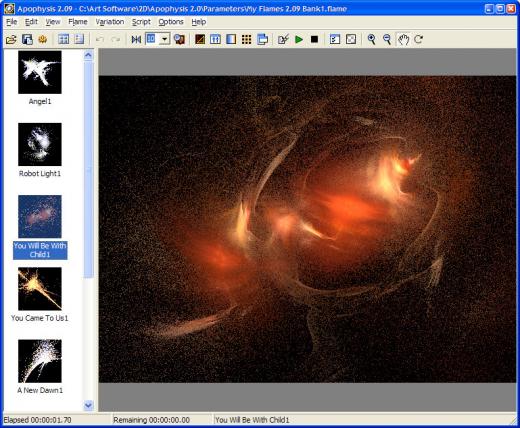
Run Apophysis to get to the main screen.
1. Creating Fractals
Select Create a New Batch (File | Create New Batch). This will autogenerate generate 100 new random fractals. These can be viewed by clicking through the thumbnails down the left of the screen (area 1 on the screen shot).
After clicking a thumbnail, it takes a second or two to generate a larger version in the main window (area 2 on screen shot).
You can drag the image inside the main viewing window to reposition it.
To increase the quality of the image increase the value in the “Iteration” dropdown (see area 3). The higher the quality, the longer it takes to process.
At any time you can click Create A New Batch to generate 100 more.
2. Saving a Preset
If you have found a fractal you particularly like, you can store the settings in a file for future use. Select “Save Parameters” from the “File” menu.
3. Saving to Disk
When you find one you like, you can save it as a JPG or a PNG.
Click “Render To Disk” from the “Flame menu”. The following dialogue box will appear.
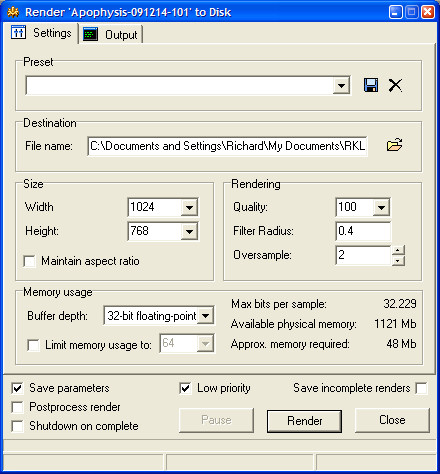
Try the following suggested settings to start with
Width: 1024
Height: 768
Quality: 100
Filter Radius: 0.4
Oversampling: 2
Then enter a filename, and click “Render”.
4. Enhancing in Photoshop etc
This article just deals with creating the fractals, but here’s a quick summary of how I process the fractal image I just saved.
In Paint Shop Pro I often duplicate to a second layer, apply a Gaussian Blur, and then a “Screen” or “Add” overlay mode to create a more dynamic, with a slight soft focus glow, and then add text.
Advanced Editing
If a fractal is close to something you like, there are a few advanced editing tools to allow you to apply various changes, and get “under the hood” of the fractal itself.
1. The “Transform Editor” (Press F4)

This allows you to edit the fractal itself. It is a complex tool, but try dragging the triangles around to see how the fractal changes.
2. The Adjustment Tool (Press F5)
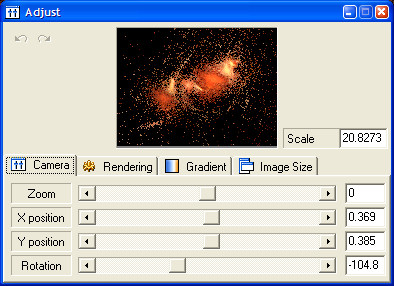
This offers another set of editing tools, including the Camera tool, which allows you to rotate and zoom the image etc, and the Gradient tool, which allows you to alter the colour palette used to paint the fractal.
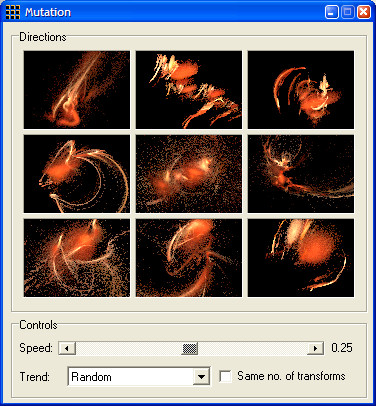
3. The Mutation Tool (Press F7)
This shows you what the fractal would look like if “mutated” in a number of different ways. Click on any of the thumbnails in the Mutation window to make it the current fractal.
This guide will get you started, but there is a great deal of depth to explore.
I hope this will encourage you to create images that help people to worship and get close to God.
Richard Lyall of craftycurate.blogs.com has not only made these images available for you to use but in another post (coming up tomorrow) he will explain how you can create similarly beautiful images yourself. Richard is a self-confessed creative geek. In a previous life he was an Anglican priest, and before that he worked in educational multimedia.
 My Favourite Guitars and a Recommendation for a Great New Buy Today from Fender
  How to get maximum exposure for your song writing
  8 ideas to encourage more participation in worship
  Streaming your worship services legally | Everything you need to know
  Streaming online church services: the tech, the tips and the stories from around the world
  What do you most struggle with as a worship musician?
  Worship Leader Training: Beginning and Ending Songs Well
  Learn how to play by ear
  4 tips for making good use of your mic

